Showing posts with label decor. Show all posts

Saturday, November 21, 2020

DIY Dollar Tree Thanksgiving Decor

 These days everyone needs a cheap and simple way to decorate for fall so consider making on of these items to decorate with. All these items are from Dollar Tree so extra cheap!


  1. A little copper spray paint completely transforms these plastic pumpkins into an elegant centerpiece.

    SONY DSC


  2. This Fall Candle Centerpiece looks easy enough for even the craft-impaired like me.

    burlap-and-leaves


  3. I love how the wine glasses in this centerpiece serve double-duty.wine-glasses
  4. These pretty mason jar vases are perfect with the sunflowers, but you could fill them with any kind of fall foliage.

    fall-centerpiece


  5. This is actually a picture from a Pottery Barn catalog, but imagine how easy it would be to replicate these with some plastic pears and a can of gold glitter spray paint. potterybarnpears
  6. Got candy corn that nobody wants to eat? Use it to make a pretty fall bouquet.

    candy-corn-vase-halloween-centerpiece-1


  7. It’s hard to believe this hurricane centerpiece was made entirely with Dollar Tree supplies.

    dollar-tree-fall-hurricane


  8. Here’s a clever way to make a fall-themed pillow cover.

    leaf-pillow-cover


  9. This fall leaf garland is as easy as it is welcoming.

    fall-garland


  10. Those same leaves take an elegant turn when they’re gussied up with some metallic paint.


  11. This candle centerpiece takes about two minutes to put together, but it looks like it’s straight out of a magazine.

    fall-008-682x1024


  12. What’s seasonal decor without a wreath? I love this version from House of Hepworths.

    canva-photo-editor-10


Friday, November 20, 2020

DIY Thanksgiving Glasses

 These Thanksgiving Glasses will look great on any table during the holiday!

Happy Thanksgiving Day glasses


DIY Thanksgiving Glasses

yield:  2 GLASSES
 prep time:  10 MINUTES
 active time:  10 MINUTES
 total time:  20 MINUTES

Materials:
  • Cut File – I used a pre-made file from Cricut Access. 
  • Cricut 
  • Permanent Vinyl 
  • Transfer Tape 
  • Smooth Cups or Glasses 

Instructions:

Open the cut file and size it to fit your glasses. These glasses are right around 4 inches. So, my images were just over 2 inches tall. Weeding was a challenge for the smaller text, but, I love the end result!
Send the image to cut. Cut as many as you will need. I only put one image on each glass. But, if you wanted to put a turkey on the opposite side, that would be cute too!
While the vinyl is being cut, was the outside of the glass really well, and wipe it down with rubbing alcohol.
Weed the excess vinyl. Then use scissors to separate the images. Next, apply the transfer tape on each image. Use a scraper or even a credit card to smooth the transfer tape on the image.
Apply the image to the glass. The glasses I used were pure cylinders, so it was easier to apply the vinyl to them without wrinkling it. Use a scraper or credit card to smooth the vinyl on the glass. Then, remove the transfer tape.


Thursday, November 19, 2020

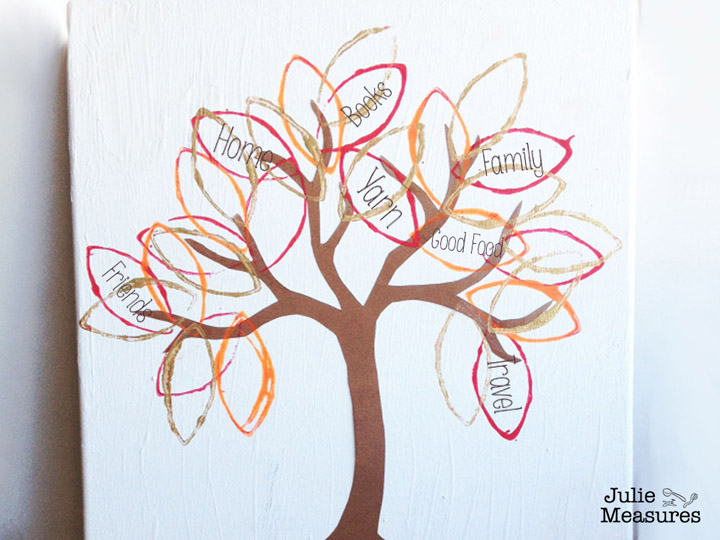
DIY Thanksgiving Tree

Kids of all ages would love to do this craft. It's simple and fun to do and you can use any color paint you want. They can also add other things to it I just gave the simple way to do this craft.


Thanksgiving Tree Supplies:

Canvas (any size)
Brown paper
Empty toilet paper or paper towel roll
Craft Paint
Scissors
Glue

Begin by cutting out a tree silhouette from the brown paper. Include the tree trunk and as many branches as you would like. Glue the paper trunk to the canvas and allow to dry.

We went with red, orange, and gold for the leaf colors on our tree. I squeezed a dollop of each color onto a paper plate. Pinch the ends of your empty toilet paper of paper towel roll to create a ‘leaf’ shape that you will use as your stamp. Dip the roll into the paint and stamp them onto your canvas, creating leaves for your tree. We layered the leaves on our tree, rotating through the various colors.

Once the leaves are dry you can use a marker to write what you are thankful for onto your leaves. Fill in your tree throughout the month leading up to Thanksgiving.